Back
Back
Keep typing for more specific results...
Models > 11060222510 > Symptoms > Noisy

Parts That Fix Kenmore Dryer 11060222510 Noisy

Noisy is a commonly reported symptom for the 11060222510 Kenmore Dryer, and we have put together a full guide on how to fix this. This advice is based on feedback from people who own this exact appliance. We have listed the most common parts for your 11060222510 Kenmore Dryer that will fix Noisy. We have included repair instructions, and helpful step-by-step video tutorials. If you are experiencing this issue, not to worry, DIYers just like you have fixed this, and shared their experience to help you!
Fixes Symptom 81% of time

This dryer drum belt (Whirlpool Dryer Belt, Drive Belt) has four ridges, three grooves and is 1/4" wide, and 92 1/4 inches in length. It comes in black and is made of rubber. The belt transfers the rotation of the motor to turn the drum. The belt attaches to the drum, idler pulley, and motor pulley.

$ 14.67
  In Stock
PartSelect Number PS346995
Manufacturer Part Number 341241

Replacing your Kenmore Dryer Dryer Drive Belt

Replacing your Dryer Drive Belt

Customer Repair Stories

Broken belt - drum would not turn
Started out taking the back off, then found online that access is from the front and much easier to get to. Simply pop the hinges in the back of the top panel and then the front of the top is popped off. From there, it is easy to remove the old belt, clean the innards (found 31 cents) and replace the new belt. It was a little disconcerting to see the idler pulley laying loose inside, but the diagram showed exactly how to put it back in place, with the new belt keeping it in place.
  • Gary from Oakland, MD
  • Difficulty Level:
    Really Easy
  • Total Repair Time:
    15 - 30 mins
  • Tools:
    Nutdriver, Screw drivers
87 of 101 people found this instruction helpful.
Was this instruction helpful to you?
Thank you for voting!
broken tumbler belt
1. Removed the screws from the lint catcher
2. Removed the bolts from upper rear of dryer
3. Pried off the dryer top from the front (it rests on rear hinges)
4. Disconnected dryer door wiring
5. Removed bolt from inside upper front corners; removed front panel (be careful: the edges are sharp and the tumbler will fall when it loses support)
6. Removed broken belt and lint from interior parts; removed tensioner (which had fallen out of place). Note: The newer models have a tensioner pulley; my older model had a smooth semicircle that was confusing at first glance
7. Flipped dryer onto its back (for easier reinsertion of new belt and tumbler)
8. Placed new belt on tumbler; reinserted tumbler
9. Inserted new belt through tensioner, inserted tensioner "legs" into grooves on floor. Note: The belt will pull the tensioner upright when it's inserted properly (which isn't obvious at first)
10. Made sure belt and tumbler seal were properly installed
11. Replaced parts in reverse order
The process took over an hour because I couldn't figure out how to insert the belt through the tensioner. The trick is to insert the folded belt through the tensioner and onto the motor pulley. If I had to do it again, it would take about 30 minutes (including cleaning lint)
  • Michael from San Antonio, TX
  • Difficulty Level:
    Easy
  • Total Repair Time:
    30 - 60 mins
  • Tools:
    Screw drivers, Wrench set
141 of 161 people found this instruction helpful.
Was this instruction helpful to you?
Thank you for voting!
Fixes Symptom 15% of time

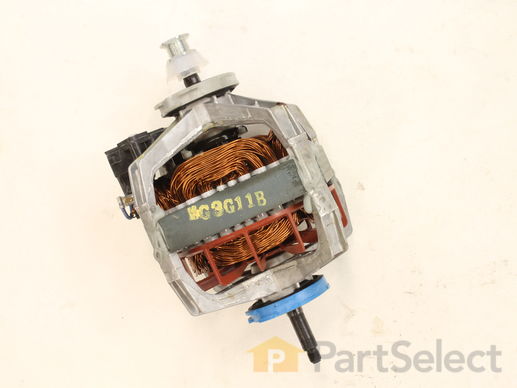
This motor fits most Whirlpool incorporated dryer brands before 1996. NOTE: Pulley is NOT available separately.

$ 92.56
  In Stock
PartSelect Number PS334304
Manufacturer Part Number 279827

Replacing your Kenmore Dryer Dryer Drive Motor w/Pulley

Replacing your Dryer Drive Motor w/Pulley

Customer Repair Stories

had to replace the motor
Follow the advice given in the partsselect website. However, while removing the blower, my hand slipped into the housing and cut my thumb. Connected the wires to the junction box on the motor but didn't realize that the contacts would hit the drum when reinstalled. The original junction box was at a 90 degree rotation relative to the new box. When trying to test the breaker tripped. Using the multitester I found out that I burned out the thermal fuse, and froze the door switch. I replace both those parts and started the dryer and could hear a grinding sound. Inspection revealed that the housing of the motor was rubbing against the drum. Removing the drum yet again, I rotated the housing and replaced the drum. The dryer was finally working well.
  • charles from parker, CO
  • Difficulty Level:
    A Bit Difficult
  • Total Repair Time:
    More than 2 hours
  • Tools:
    Nutdriver, Screw drivers
31 of 43 people found this instruction helpful.
Was this instruction helpful to you?
Thank you for voting!
Make humming noise when pressing start button. Would not start
After looking on the website for advice I walked throught the simple steps of disassembling the front, removing the drum, removed the back, disconnected the wire harness. Then removed the blower housing in the back. The blower, mounted on the back side of the motor was very tight. I used a pipe wrench wedged in place and help by my 10 year old Grand-daughter while I used an adjustable wrench to turn the shaft on the front of the motor. Spun the blower off, removed the two clips holding the motor. Then reversed the process when I received the new motor. Care should be taken to avoid damaging the blower fan if a lot of pressure is required.
  • James from Moscow, IA
  • Difficulty Level:
    Easy
  • Total Repair Time:
    30 - 60 mins
  • Tools:
    Nutdriver, Screw drivers
97 of 111 people found this instruction helpful.
Was this instruction helpful to you?
Thank you for voting!
Fixes Symptom 2% of time

If your washer shakes or vibrates loudly when it reaches its max speed, check that the leveling legs are even. To ensure that the washer is firmly on the ground using all four legs, adjust the legs so that the machine is level, and tighten the locking nuts on the legs that are threaded. Keep the washer as close to the floor as possible. Your model might have rear legs that level themselves, or it might have threaded legs all around. Make sure the rubber feet have not worn out. Replace any missing or damaged legs and feet. This replacement part is sold individually.

$ 7.29
  In Stock
PartSelect Number PS1609293
Manufacturer Part Number 49621

Replacing your Kenmore Dryer Washer Leveling Foot

Replacing your Washer Leveling Foot

Customer Repair Stories

Washer overflowed
Once I watched a YouTube video showing me how to do the job I ordered the part from you. Am so impressed with your fast shipping and best prices via the Internet. Thank you SO much! The water level switch was easy to install, it ws getting the cover on the washer back on that was hard for me since I am 68 yrs old and have a bad knee. Its why it took me two hours to do what most people could do in 20 minutes.
  • Beth from Valley Springs, CA
  • Difficulty Level:
    Really Easy
  • Total Repair Time:
    1- 2 hours
  • Tools:
    Screw drivers
Was this instruction helpful to you?
Thank you for voting!
No leveling feet on dryer.
This could not have been easier. The hardest part was tipping the dryer over on its' side.
Instructions:
1. Tip dryer over onto a non-scratch surface. I used a tarp on the floor.
Insert leveling foot into the foot opening on the bottom of the dryer &
screw in with fingers until it is difficult to turn.
2. Use the adjustable wrench on the hexed foot (not the threads) to adjust to the desired level.
3. Tip dryer upright taking care not to exert pressure on the feet closest to floor. I used a folded-up tarp under the bottom edge of the dryer while lifting it to the upright position.
4. Use a level, back to front & side to side, to determine if feet need further adjustment.
5. Adjustments can be made with the dryer in the upright position, using the adjustable wrench on the hexed foot.
  • Bobbie from BEND, OR
  • Difficulty Level:
    Very Easy
  • Total Repair Time:
    Less than 15 mins
  • Tools:
    Wrench (Adjustable)
2 of 2 people found this instruction helpful.
Was this instruction helpful to you?
Thank you for voting!
Fixes Symptom 1% of time

The WP8066184 is a dryer motor pulley that is used in some dryer models. It supports the motor belt where it connects with the motor. Symptoms of failure include squealing or grinding noise during drum rotation. Please use the model number of the appliance to check for compatibility before purchasing.

$ 38.95
  In Stock
PartSelect Number PS11744884
Manufacturer Part Number WP8066184

Replacing your Whirlpool Dryer Dryer Motor Pulley

Replacing your Dryer Motor Pulley

Customer Repair Stories

Needed to repair and replace dryer motor pulley and pully
this was very was very easy. But I deviated from the You Tube instructions. One to release the motor pulley. I needed to use 2 adjustable wrenches for a longer lever. I needed to use a hammer to help release pulley. Second to remove the dryer cable I needed to use a small screw driver to aid in the release. ---- the part from the company was a perfect fit.
  • Rob from GAITHERSBURG, MD
  • Difficulty Level:
    Really Easy
  • Total Repair Time:
    30 - 60 mins
  • Tools:
    Wrench (Adjustable)
6 of 6 people found this instruction helpful.
Was this instruction helpful to you?
Thank you for voting!
Replaced a broken pulley.
Half of my pulley was broken off so there were no wrench flats to take it off. I was able to remove it using Channel Locks and the 7/16 wrench shown in the video.

Hint: Use a one gallon ice cream bucket to hold up the drum while connecting the belt. It makes it much easier and gives you more clearance.
  • Brian from IMLAY CITY, MI
  • Difficulty Level:
    Very Easy
  • Total Repair Time:
    15 - 30 mins
  • Tools:
    Nutdriver, Pliers, Screw drivers, Wrench set
10 of 12 people found this instruction helpful.
Was this instruction helpful to you?
Thank you for voting!
Fixes Symptom 1% of time

This part is the replacement single front panel clip for your dryer. It is made of metal and is approximately 2 inches long and ¾ inch wide. The front panel retainer clip is what holds the front panel on to the dryer. If the clip is damaged or missing, or if the front panel appears loose, you may need to replace the clip. This part is sold individually and is an authentic OEM part.

$ 15.73
  In Stock
PartSelect Number PS11731288
Manufacturer Part Number W10854425

Customer Repair Stories

Broken clips
Turned off power and pulled power plug from the wall. Removed the two screws at the lint screen. Raised the top to by depressing the top spring clips. Removed the two 5/16" screws from front top. Removed wiring clips from front panel. Set the front aside while I removed the two broken panel clips. Installed the two new panel clips. reinstalled the front panel by placing the front panel above the sides. Opened the front panel door and supported the drum while allowing the front panel to slide down onto the new front panel clips. Reinstalled the wiring clip. reinstalled the two 5/16 screws. Turned the drum to ensure that the felt seals and drive belt weere installed properly. Lowered the top and reinstalled the two screws at lint screen. Reinstalled power plug and turned on power. No rattles or squeeks!!!
  • Roger from Twinsburg, AL
  • Difficulty Level:
    Easy
  • Total Repair Time:
    30 - 60 mins
  • Tools:
    Nutdriver, Screw drivers
0 of 1 people found this instruction helpful.
Was this instruction helpful to you?
Thank you for voting!