Enter the code USA15 at checkout to apply your discount. Discount will be applied at checkout when the code is entered & applies to all parts. Cannot be combined with any other coupon or special offer & cannot be applied to a previously placed order. Not valid toward tax or shipping & handling. Discount has no cash value. Discount expires on July 4 at 11:59pm EST.
You've Got 10% Off Your First Order!Save 10% with code at checkout *click to copy coupon code
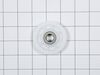
The lint filter in your dryer is used to collect lint as it passes through the dryer vent. If you notice that your dryer is not providing enough heat, or if it takes too long to dry, you may need to r...
The sensor controls the temperature in your dryer and will turn off once your clothes have reached the desired dryness level. If you notice that your dryer is not giving off enough heat to dry the clo...
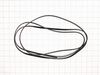
The belt wraps the length of the dryer drum, secured by a tension pulley and then loops around the motor pulley. If you find that the drum is not turning properly or at all while your dryer is in succ...
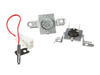
This dryer thermistor temperature sensor helps monitor and regulate the temperature inside a dryer. This part includes the wire harness. If your dryer overheats, does not produce enough heat, or takes...
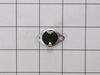
The thermostat is a part for your dryer, and it is roughly 1 inch long by roughly 1.5 inches wide. The purpose of the thermostat is to measure the temperature of the air inside your dryer drum. As the...
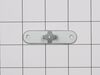
This part is the replacement high-limit thermostat, or simply the thermostat for your dryer. It is approximately 2 inches wide from tip to tip. The center, rectangular portion of the thermostat is app...
This dryer thermistor temperature sensor helps monitor and regulate the temperature inside a dryer. This part includes the wire harness. If your dryer overheats, does not produce enough heat, or takes...
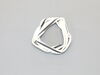
This genuine OEM felt gasket provides a cushioned seal between the inner tub of your electric dryer and the rear panel. It prevents your clothes from getting snagged and helps in heat retention. You w...
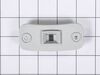
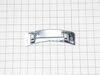
This genuine OEM filter guide keeps garments from exhaust air duct and lint screen inside the dryer. The filter guide is made of high quality plastic and is approximately 15 inches long by 3 inches wi...
I noticed the flame would start, then quit after about 15 seconds. I checked the flame detector, and found the lenze cracked. I replaced it, and it's as good as gold.
It looked like a hard job to take the drum out to get at the part. But the top was off with 3 screws, the front about 6 I think. Then the front frame, only 4 s
... Read morecrews. I think setting the belt tentioner was the hardest thing to do.
Done in 45 minutes, both the job, then the next load of laundry.
The first thing I did was locate a copy of the Service Manual (not the User / Owner Manual). After looking at that and looking online I learned that there is no sensor for the Flow Sense feature itself. The Flow Sense doesn't detect a blockage. It detects excessive heat and the manufacturer has simply concluded that too much heat is most
... Read morelikely caused by a blocked duct and then it activates the Flow Sense safety feature: cutting off the heat source. Since I knew it was a heat problem I figured I'd get inside and check the two thermostats and the igniter. Igniter was fine, one thermostat was fine, the other one - the High Limit Thermostat - was giving inconsistent readings. I replaced it. Here's how: First I took the dryer apart. This is a little time consuming. There are a lot of parts that need to come out. I recommend that you put the screws in small baggies with a note as to where you took them out of so that you know where they go when you put it back together. You need to remove part of the back, the top and the front. I removed the electrical box because that is what is shown in the manual but I'm not convinced that I needed to. See if you can get the rest of the dryer apart without removing it but if you have to remove it it's not that big of a deal. It's a little tricky to detach the wire harnesses is all. And extra steps, of course. I did not remove the drum. Instead I just reached inside with the front off and pulled the wires off the thermostats to test them for resistance with a multimeter. It was kind of a pain and a little awkward but I did not want to mess with the drum tensioner. Once I figured out that the High Limit Thermostat was the likely culprit I removed it - which required a very short Phillips head screw driver and some patience since I could not actually see one of the screws. But all good. Just remember which wire goes on which terminal. Make a note for yourself: gray back / red front - something like that. Then I ordered the part and installed the new one and rebuilt the dryer in reverse from what I did.
Now, here's the thing: I actually did two things: aside from changing the thermostat I also thoroughly cleaned out the dryer. Somehow a lot of lint built up in there - no idea how since it all appeared to leave the dryer through the vent. but there must be some small gap somewhere. I cleaned everything including the flame detector. When I put it all back together it worked but I'm not 100% sure that the thermostat was bad. It's at least possible that all the lint and dirt was messing with the way the thermostats behaved. So what I would recommend, if you have this problem, is to clean it out first and then put it back together enough to run it and see of the heat comes on. It will take maybe 30-60 seconds for the heat to come on while the igniter lights. If not, go ahead and replace whichever thermostats or other parts you think are broken.
I'm not for reading instructions. So I just dove right in and took the dryer apart to get down to the motor. I gave the dryer a thorough cleaning and replaced the 3 parts I ordered from the online recommendation. Wish I would have ordered 2 sensors and the 2 thermostats that are near the burner. Just so replace beings I was in there. Repl
... Read moreacing the parts was easy, found them just by looking for matches to the new parts. Reassembled the dryer, dont think I put a single screw back where I got it lol. And still haven't put the top lid back on due to difficulty. Not sure if I even needed any parts, found a nest in my outside vent completely plugging it. But after a good cleaning and replacing the parts the dryer dries the best it has since we've owned it. The dryer came with our house which we bought 3 years ago and it was 2 years old when we purchased the house, so it is now 5 years old.